Saturday, December 22, 2012

Pros and Cons - Bath Fizzies DIY

I am all for making things to save some money. Just ask anyone that knows me. So when I saw the bath fizzies, or bath bombs as people call them, on Pinterest, I just had to try them.

My advice? Buy them pre-made. Seriously. Unless you want to buy in bulk for your supplies, spend hours making them, and then have 1332353 bath bombs in your kitchen, this is not for you. 

I am a Scentsy Independent Consultant. And we have a line of bath tablets that are A. more cost effective, B. smells great, and C. already have packaging that are 100 times better then the ones you can make for yourself. Again, unless you are wanting to make these to sell.... check out Scentsy's. I promise you they are great. I have used them. And now I have made my own. 

Here's the cost of Scentsy Bath Tablets: 
10.00 
They come in a lot of different fragrances ( my personal favorite is Lucky in Love which smells like Love Spell)
Here's a link to check them out- Scentsy Bath Tablets

Now you might be thinking "10.00! That's kind of expensive." 

Here's what it cost to make my own ( and keep in mind this does not include colors- you have to use special colorants so it wont stain, or any essential oils or carrier oils for your body like the Scentsy ones does.)
All I used was 3 ingredients:

Baking Soda
Citric Acid
Peppermint Oil ( not extract!!!)


The cheapest citric acid i could find w/ shipping was 4.49 and that was for 4 oz. 
The cheapest Peppermint Oil i could find was 1 oz for 6.30 shipped
Um that adds up to over 10.00
that doesnt include the baking soda which is relatively inexpensive but you are now at around 12.00 w/ tax for all your items. 


This was just to make a gift. One gift. This doesnt include your time to do this either. Or a mold. I had to go dig out a mold! ( mine are very small b/c I did not have the funds to buy a mold just for a bath bomb!)

Not to mention i have to let them sit for 4-8 hours before i can touch them.

So I followed this Pinterest link HERE and made my own. But do not get me wrong- Soap Queen is amazing. And there are some things in her blog and on her youtube link that I really cant wait to try. But if I did it with everything she wanted me to use, id be out over 20 bucks just for some bath fizzies. For one person. Im too frugal for that and know when purchasing them is a lot easier and better then doing it yourself. 

Its a fun project to do, do not get me wrong, but about 5 of mine didnt come out :( and if i wanted to make them larger, you are looking at getting about 4 out of what i used for about 13.00. And if you want to make them colored or maybe add some oils for your skin add on another 10 plus bucks. So 23.00 and up for 4 no thanks. Too much work for me. I encourage replies and responses. I also encourage you, if you are skeptical, to try it for yourself. Try the Scentsy and try your own. Ill stick with Scentsy!

xoxo-
Stephanie


DIY Bodywash- Pinterest Project

First off- Merry Christmas! ( yes I know its still 48 hours away) I wanted to wish my new fans a very Merry Christmas. Not a Happy Holiday. Sorry, not that kinda girl here ;)

Ok so onto the fun part. My DIY adventure into making my own body wash. Here is the original Pinterest Link - DIY Bodywash that i went off of when doing this little task.

I have to say, that whoever originally pinned this, must have had some magic on their side, because I followed it to a T and still came out runny. I had to let mine sit for about 24 hours in the bottle before it became body wash, and not body milk. Works great now.

Also, the original pinner said to use 2 cups of water and half a bar. Um yeah no.

Here's what I used to make it :
2 Cups of water and 1 full bar
This filled up one of those disposable ketchup/mustard bottles perfectly.

I grated and chunked my bar soap up first. Then put it all on my stove in a pan. I used a candy thermometer to get it up to 190 degrees which seemed to be the trick it making it thicker. I then had a milk like substance, very very thin, so i just poured it in the bottle and waited. After 24 hours and a good shake, its now pretty decent in the consistency of actual body wash. 

Here's my finished project 


I just used a regular bar of Olay soap. I had gotten some for .27 cents for 2 bars with some coupons I had and figured why not try it out. My advice? Play with the recipe and see what works best. Im glad i added the extra soap !


xoxox-
Stephanie

Sunday, December 16, 2012

DIY Bath Scrub/Hand Scrub and Bath Salts

I am a sucker for bath products. When we went on our honeymoon, there was this store that I had gone into a few times on previous trips, that had all these amazing looking (and smelling) bath products. Soaps and scrubs to the hearts content. 

On my honeymoon, I bought some. And spent 50.00. And it wasn't even that much. But I was happy. Then I found Pinterest. And now I am like "Why didn't I look online sooner???" 

There are so many versions out there. And me, being a newbie, decided to use the simplest one. Just to see if I could really "do" this. And I can. And it was easy. AND I FELT ALL POWERFUL.

First, I made a lemon hand scrub. 

2.5 cups sugar 
Lemon juice- now they say to go for fresh lemon juice, but our Walmart was out of single lemons ( really???) so I got the small bottled lemon juice next to it. It wasnt working to my liking ( not enough smell) so i used lemon extract. Just a small small bit to give it some smell. 4 tablespoons lemon juice and 1/2 teaspoon lemon extract worked well for me
1 cup olive oil. It is supposed to be extra virgin olive oil but i ran out and only had half a cup so i had to use regular olive oil. 

Mix all together. Put in cute container. Your done.
 Here's mine:


Excuse my mess ;) I am not neat when I create. I just used jelly jars from Wal-Mart. These were 8 bucks for a set of 12

Next, I decided to make some Bath salts. I had done some research and saw so many different ways to do this. Then I found one that was super simple. I , however, did not use essential oils because I do not have any on hand. It did say you can use extracts though. It doesnt have any of the properties that oils would have ( which ill have in my next batch) but it smells awesome and still has the properties of the salts for your bath.

Here's what you need:
1 cup Epsom Salts
1/2 cup kosher salt ( i used course sea salt kosher salt)
essential oil ( or extract i used strawberry and coconut) i used a VERY  little and it was more than enough, my whole house smelled like coconut and strawberries lol
Food color- i used blue in the coconut just one drop at a time so it doesnt melt the salts. I only used 2 drops. For the Strawberry it was already pink colored ( the extract) so i added only 1 drop to give it a bit more pink/red color. 

Combine the salts and mix. Then add everything else and stir/mix well! Thats it. 


Now, onto the fun part - GIVEAWAY!!!
One person will win one of each! Just enter the Rafflecopter below to win. 


a Rafflecopter giveaway

Thursday, November 15, 2012

DIY Christmas Ornaments

OK, So I was trying to find something fun and quirky to make to put on my pink tree this year. I have Tinkerbell ornaments I use every year, but I always want to make things more personal. I came across this project while surfing the internet for something else. It was originally for keychains using wooden squares. I would most definitely use the wooden squares for key chains or for necklaces. But for ornaments, I think these work great.

All you need is the following:

Jewelry Findings


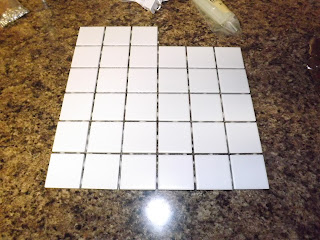
This is a set of tiles from The Home Depot. I bought the entire sheet for under 3.00

A Glue Gun

Then all I did was hot glue the jewelry finding to the back of one of the tiles. Then took a sharpie and decorated. You could use anything. Super easy. I made sure to hot glue it on and then hot glue it on top to secure it.


Enjoy!


Monday, November 5, 2012

Storing Fabric

So, I am a huge sewer these days. I have always loved fabrics, and usually will be 1/2 yards and yards at a time, when I find a print I like, or more if I really love it. But over time, I get confused on what I have bought.

I will be in the store going " Did I buy this last week??" and then I end up buying duplicates when I really do not need to spend the money.

I hate putting fabric in bins, because then you can not see what you have, or easily access it when you want to make something, without digging for it. And that hurts my back. And frustrates me when I can not find something I KNOW I have.

So, I decided to do some looking around the net. I went to Pinterest and of course there are tons of storage idea's. Even getting old bolts that fabric come on to wrap them around and store them. But, who has a spare fabric shelf in their house? And then I saw the idea about putting them around file hangers, and being able to hang them in filing cabinets. I thought " Brilliant! I will be able to just tab through them." Which is a great idea, but I do not have any filing cabinets, nor do I want to go buy any. I am frugal remember?

So tonight, while I was trying to find some fabric, once again, for a project I wanted to do, I came up with a great idea. I am sure someone, somewhere has done this, but it is new to me.

Take a hanger, the ones you hang shorts with, that have the clips on the end? Yep those- and hang up your fabric. Um, hello, super easy, cheap ( i have a gazillion of these laying around right now) and best of all you can probably find a closet to use in your house. I have a craft room with a walk in closet. Now I know what I am going to be doing with that unused space.

And, here's one of the best features- you do not have to bend over to get to anything. Its eye level. Brilliant.

If you have more than 2 yards you might have to cut it or store that, as I am not sure how much it would hold on a hanger. But for me 1-2 yards and less is all I usually have on hand. I am not to the "by the bolt" stage just yet.


xoxo
-Stephanie

Wednesday, October 31, 2012

Getting married? Check out this Blog!

A fellow couponer and blogger is engaged! Lisa over from Drugstore Diva's is engaged to be married, and has started up a great blog called A Bride on a Budget. And we all love to be frugal right? So head on over there and check it out.

As soon as I get my coupon blog back up and running ( sigh) I will be putting her link on there too.

So from all of us at Penny Pincher Pixie ( and DIY Pixie) we wish you much luck, success and love Lisa!!!


xoxox
Stephanie

Monday, October 29, 2012

DIY Gifts for Christmas and More Part 3

Here's some more DIY projects for you! Again, some may be duplicates, but a lot are new ideas. Have fun!!

1. Sewing Kit In a Jar- this is brilliant. I love it!

2. HUGE list of DIY Mirrors and Home Decor

3. Birthday in a Suitcase- this site is awesome. I would spend some time on here as these idea's are great!

4. DIY Smore's Gifts- brilliant! Just brilliant!

5. Giant Bubble Kit- this would be great for summer adventures!

6. Lump of Coal- great DIY for a stocking stuffer!

7. The Ultimate Care Package- great for those travelers or kids/family members/friends that have moved over seas or to another state!

8. DIY Bath Salts- good tutorial for making your own.

9. Gift Inspiration Board- pretty cool site with lots of information!

10. DIY Flavorful Fudge-  make your own fudge!

11. Etched Glass Jars- love, love, love this idea!

12. Food Gifts- nice list from Martha Stewart!

13. His & Hers Pillowcases DIY- i might have to try this for my brother and his new wife hehe ( you know when the honeymoon is "over" lol)

14. Mario Plant- for you Nintendo Geeks out there, here's a great project for you!

15. Gifts for Men- i love the record bowl idea!!!!

Sunday, October 28, 2012

DIY Canvas

I found this site about a month ago, and I love it and can not wait to try it! What do you think???

DIY Canvas

I have some photos I would love to try this with. And it would be great for family photos.

xoxo
DIY Pixie Stephanie

Saturday, October 27, 2012

DIY Fairy Wings

Want an easy way to make a set of fairy wings?

You will need:
White pantyhose ( or any color but white you can dye them or paint them and it will show up better)
Wire hangers or another bendable structure ( like pipe cleaners, floral wire, etc) just something that retains it shape after bending
Scissors
Embellishments
Ribbon, string etc

Take your bendable items, shape into fairy wings. Use your imagination on if you want butterfly wings, fairy wings, ladybug wings etc)
Cut your pantyhose into separate legs
Stretch each hose across your wing
Tie them together where they meet- you can get creative on how to get them to attach. I have seen some just tie the pantyhose together.
Then you can take ribbon or string and make your arm straps ( like a backpack)
Embellish however!

I might have to try this one day  ( if I ever have a kiddo to try it on lol)

xoxo
-DIY Pixie Stephanie

Friday, October 26, 2012

DIY Christmas Gifts and more Part 2

Here's 15 more links to more handmade gifts and other things to make ! Enjoy
** I am sure some are duplicates but great ideas, from different perspectives, make it new**

1. Christmas Craft Ideas- This is from Family Fun Magazine! They always have great stuff. I have been getting their magazine for years ( even though I have no kids) because the magazine is awesome.

2. Teacup Candles- from Martha Stewart. Very cute idea

3.  Photo dolls- a bit creepy ( I dont know if I would want to see my face on a doll) but really cute idea. Might be a little over cost effective but maybe something someone would like to do!

4.  34 Christmas DIY ideas- I really like some of these. Especially the truffles. I LOVE chocolate!

5. Unique Gifts for Mom- some of these are very different. But would be fun to do with kids for all occasions ( Mothers Day etc)

6. Surprise Gift Ball- now this is awesome and cool! Great to do and then give kids on long car rides. Or maybe when they have to go to the dr and wait... and wait...

7. Personalized Plates & More- for those of you that did the "sharpie" method and it didnt work- check this out!

8. Kitchen Utensil Key Rack- great idea for reusing those old forks and spoons!

9.  137 Unique and Cheap gifts- this is a great spot! It also shows you how to do the tiles i was talking about!

10. Egg Cup- while I do not think my husband would ever use this, i love this site. I came across it while looking for men christmas idea's. I love LOVE the background

11. DIY tote bags- I LOVE THIS!!!!!

12. 100 Inexpensive Gifts- these may have some repeats, but some are ones I have not seen. And always a different take on some of the ones you might HAVE seen. :) all about perspective!

13. DIY Geek Tie- I am DIGGING this one!

14. Crafts for Kids- this is also a link to drawing on plates , but is a great site for Crafts for Kids!

15. Monogram Mugs- another take on the customized dinner ware!!!


Wednesday, October 24, 2012

Throw Pillow DIY

These are two pillows I made from things I already had laying around. Here's what I used:

1 old pink curtain- its a heavy weight one that I had bought for a window at my old house, before we moved. It had gotten bleached out at the very top and on the entire back side from the sun, but the front side was great. So, I used it instead of throwing it away! You can use any kind of fabric, curtain etc. Just whatever you have that is laying around that you have enough material of for 1 or 2 pillows.

1 pair of old jeans- i cut the legs off of them ( cut across where the crotch is so you can re-use the upper part of the jeans to make the jean apron i will be posting soon) and then i drew on them with sharpie, in the shapes of hearts. Cut them out and set aside. You can do stars or whatever you want!

1 piece of old fabric- i used some blue snuggle flannel that I had left over from another project.

Poly-fil - i used half a bag. I got it for free from my grandma, as she had some bought up and was not going to use. Ask around and maybe you can find a friend, relative, neighbor that has some they are not going to use or will give to you!


First- cut out the squares in the size you want your pillow plus enough for a seam allowance.
Second- turn inside out and align. Pin down the fabric along three sides to sew. Or you can always use a baste stitch on your machine to keep it where it should be.
Third- sew three sides of the material together. Make sure to back stitch when you end your sewing. This will secure it. I always back stitch over the beginning and the end.
Fourth- turn inside out and get all the creases around the edges lined up. You will be top stitching over these. Now stop stitch along the three sides. Basically all you are doing is sewing it together again, but the thread can be seen. I used a hot pink thread to make it stand out! You can use a matching thread so you cant see it.
Fifth- put your design on your pillow and sew on. Or you can always make them a patch with Heat N Bond Ultra. I chose to sew on.
Sixth- fill with your poly fil. You can make it as full as you want. I don't put a lot in my pillows, just enough to make them filled out and soft.
Seventh- turn in the fabric along the side you left open. Leave enough of a seam so you catch it when you stitch it.
Eighth- align the edges and top stitch. Make sure you back stitch when you begin and end. This should be the bottom of the pillow and will match the other top stitched sides!

Your done!


Super Easy Tshirt Tote Bag

Seriously this is the easiest thing I have ever seen. And It is great for grocery bags. Instead of buying another re-usable shopping tote/bag, just make one from your old t-shirts! I will be posting mine that I put together soon. I am also using old shirts to make a memory blanket/quilt.

T-Shirt Bags


Here's my finished project. I did end up top stitching the side arm holes to give it a more finished look. And will probably not do it for the neck hole. But I am going to do some fabric piecing on the front of some fruit, and use this as one of my produce bags. This way I don't have to use those plastic ones for my bananas and other fruits- like apples, pears etc. I would make a second one for stuff like onions and other items that have a outer "shell" that sheds ( like the onion skins etc). Totally washable and re-usable! And the best thing- THEY ARE FREE TO MAKE.


300+ Links to DIY Projects, Gifts and Decorating - Part 1

I am a huge Do-It-Yourself person- or DIY. And I love Pinterest, I am constantly on there looking up stuff. I have compiled a list of all sorts of goodies for you. From cheap projects to give as gifts, to decorating ideas on a extremely tight budget. I hope you enjoy some of these. I will be doing each and every one of them the following months, posting pictures, tips and tricks and more. Maybe I will do a review and giveaway for each one I do for a reader. Who knows?

Here is part 1 of the list. Im doing them 15 links at a time, as some of them have tons of ideas on there. I have over 300 links. So ill be doing several parts to this series!!!! 

So, without further wait, here we go :

1. Time for Tea Soap- think this is super neat. I am not a tea drinker but I love the smell of it. And i have so much tea I have gotten for FREE with coupons, I bet that I could make some awesome tea soaps!!!

2. Cupcakes in a Jar - great treat idea to take to coworkers! If you do not want to buy mason jars ( and do not have any laying around) ask around as I am sure some have empty ones. I found them from my grandma for another project.

3. Apple Jellies- you could also probably make different kinds with different fruits. However, if you do not have a food-mill, you can use a sieve it says- but its very time consuming. So see if you can borrow one from someone. Its a good investment if you are doing your own food grinding to have. But you might can borrow one from someone and do it the easy way. A cheap, awesome way to make some candy for friends and family. And it makes your house smell yummy!

4.  Bath Bombs- these are a bit more labor intensive. And do call for a few ingredients you probably dont have laying around the house. However, I thought I would add them because a lot of people would love to make their own. Maybe you and some friends can go in on the ingredients and have a "spa day" together!

5.  Gifts for Teachers- here are several different ideas to make for teachers! This site has a ton of ideas.

6.  8 Easy Handmade gifts-  some of these are great for kids to make for grandparents :)

7.  Cheap and Thrifty Christmas Ideas- great site with a huge selection of various thrifty and handmade ideas.

8. Hand Printed Mouse pad- great for the man in your life that is hard to buy for. Unique and fun!

9.  Embroidered Tie- great gift for the man in your life. This is for those crafty people that can embroider ( by hand) im sure you could also do this on a machine. If you cant embroider- maybe you know someone that will do it for you in exchange for something! Maybe you make a killer batch of brownies! Offer to trade services!

10. DIY labels for gifts for dad- not just for Fathers day!

11. Ribbon Chalkboard w/ key holders- you can probably find some of these objects at thrift stores. Or ask around.

12. Decorative Wine Stoppers- cute idea! great for a hostess gift for holiday parties for those that love wine!


13.  30  Gifts for the Guys- great site! check out all the creative gifts for the men folk!

14.  30 Gifts for the Chic Chicks- and some more gifts for women!

15.  30 Gifts for Kiddos!- and here's some for the munchkins!